Friday, September 28, 2012

Evoking an Era with Accessories


If you're like me, you like to get your money's worth out of a dress no matter how much money, time, or energy you put into it. Remember that green dress from my earlier post "detaching a bodice from it's skirt"? Fast-foward a year or more and the dress has been hanging in the closet collecting dust since its debut in 2011. Time to whip it out again!

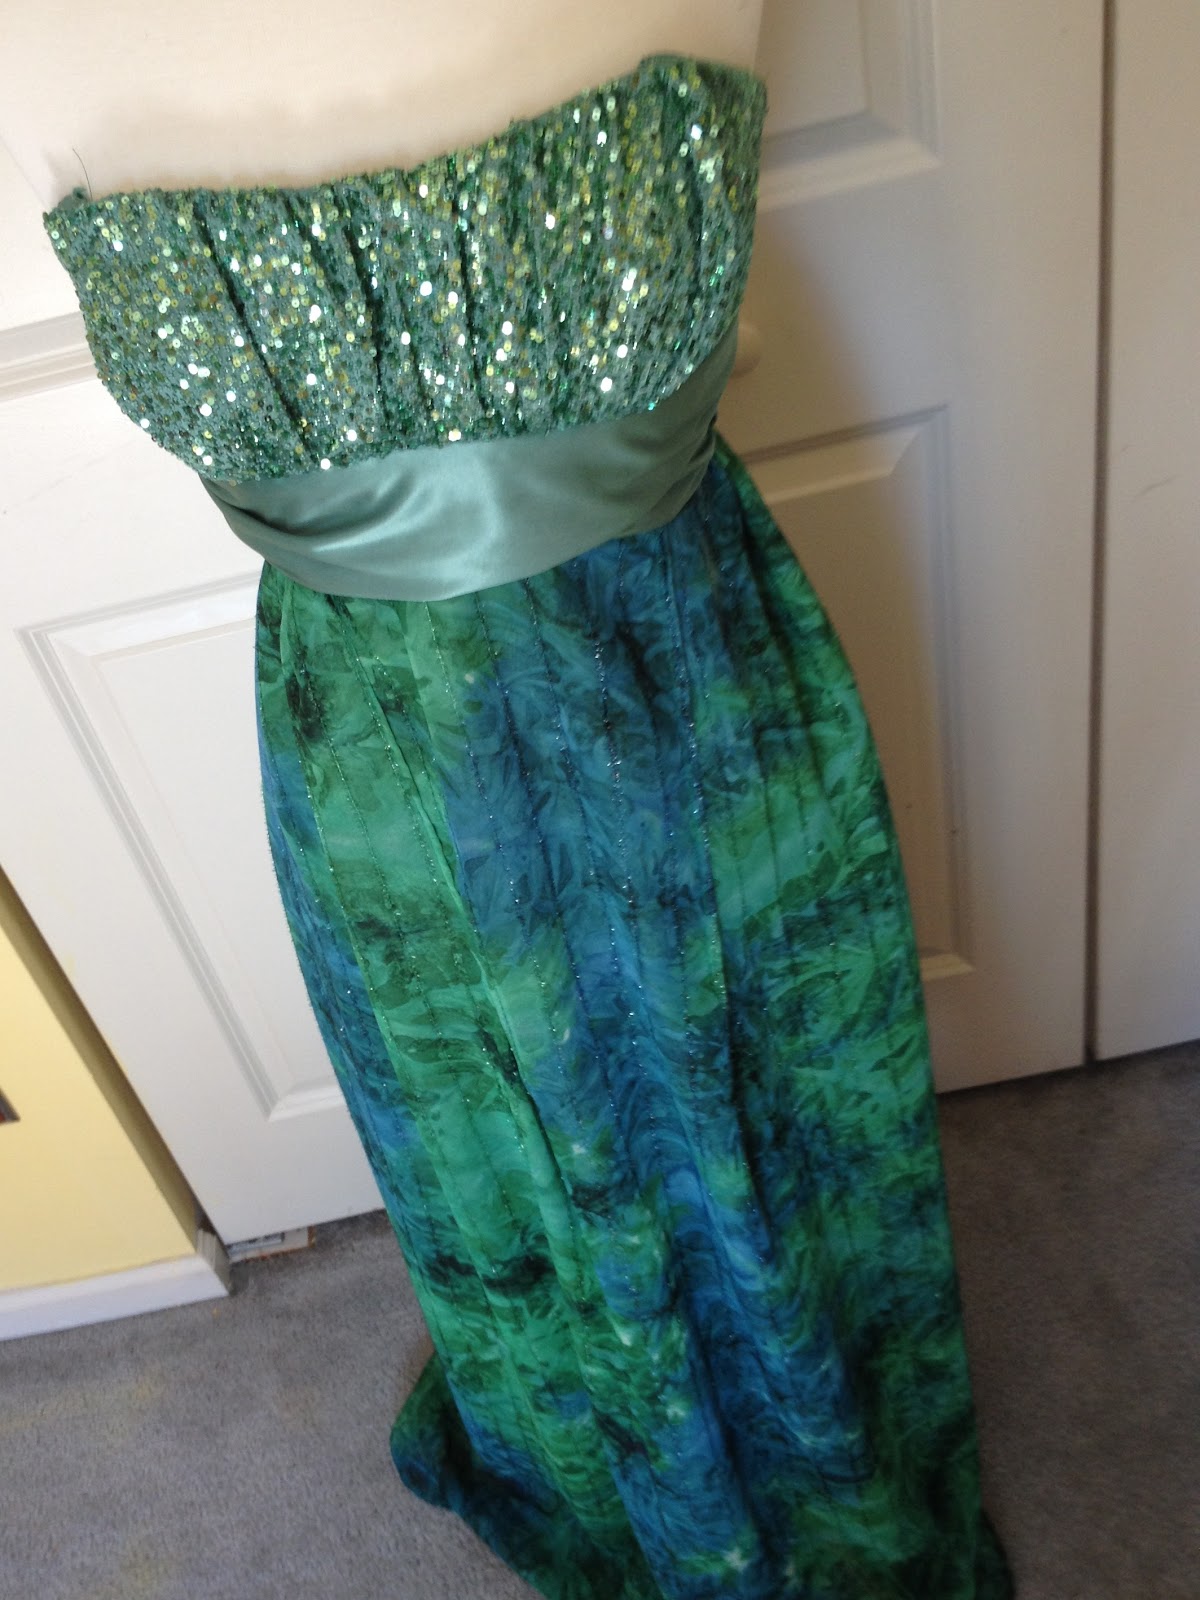
As I mentioned in a previous post, my husband and I hosted a cabaret show in our home. All guests were required to dress in attire evoking vintage hollywood...from fascinators, fedoras, feathers and fishnets...to bow ties and boas. Red lipstick, long-stranded pearls, and gloves also made appearances. I don't claim to be a vintage clothing historian, but surfing the web for 30s era clothing gave me some ideas... a long draping dress, sequins, a fascinator, gloves, and some vintage jewelry. I thought this dress would work perfectly for the occasion.

I wore the dress accompanied by this lovely fascinator I found at FascinatorsNYC.com. They have a great selection at a variety of price points. There I found some of the most inexpensive fascinators on the web; but don't confuse inexpensive with cheap! The fascinator I got was very well made and versatile, I can wear it as a hair clip or pin it on clothing. They shipped promptly and shipping rates were very reasonable.


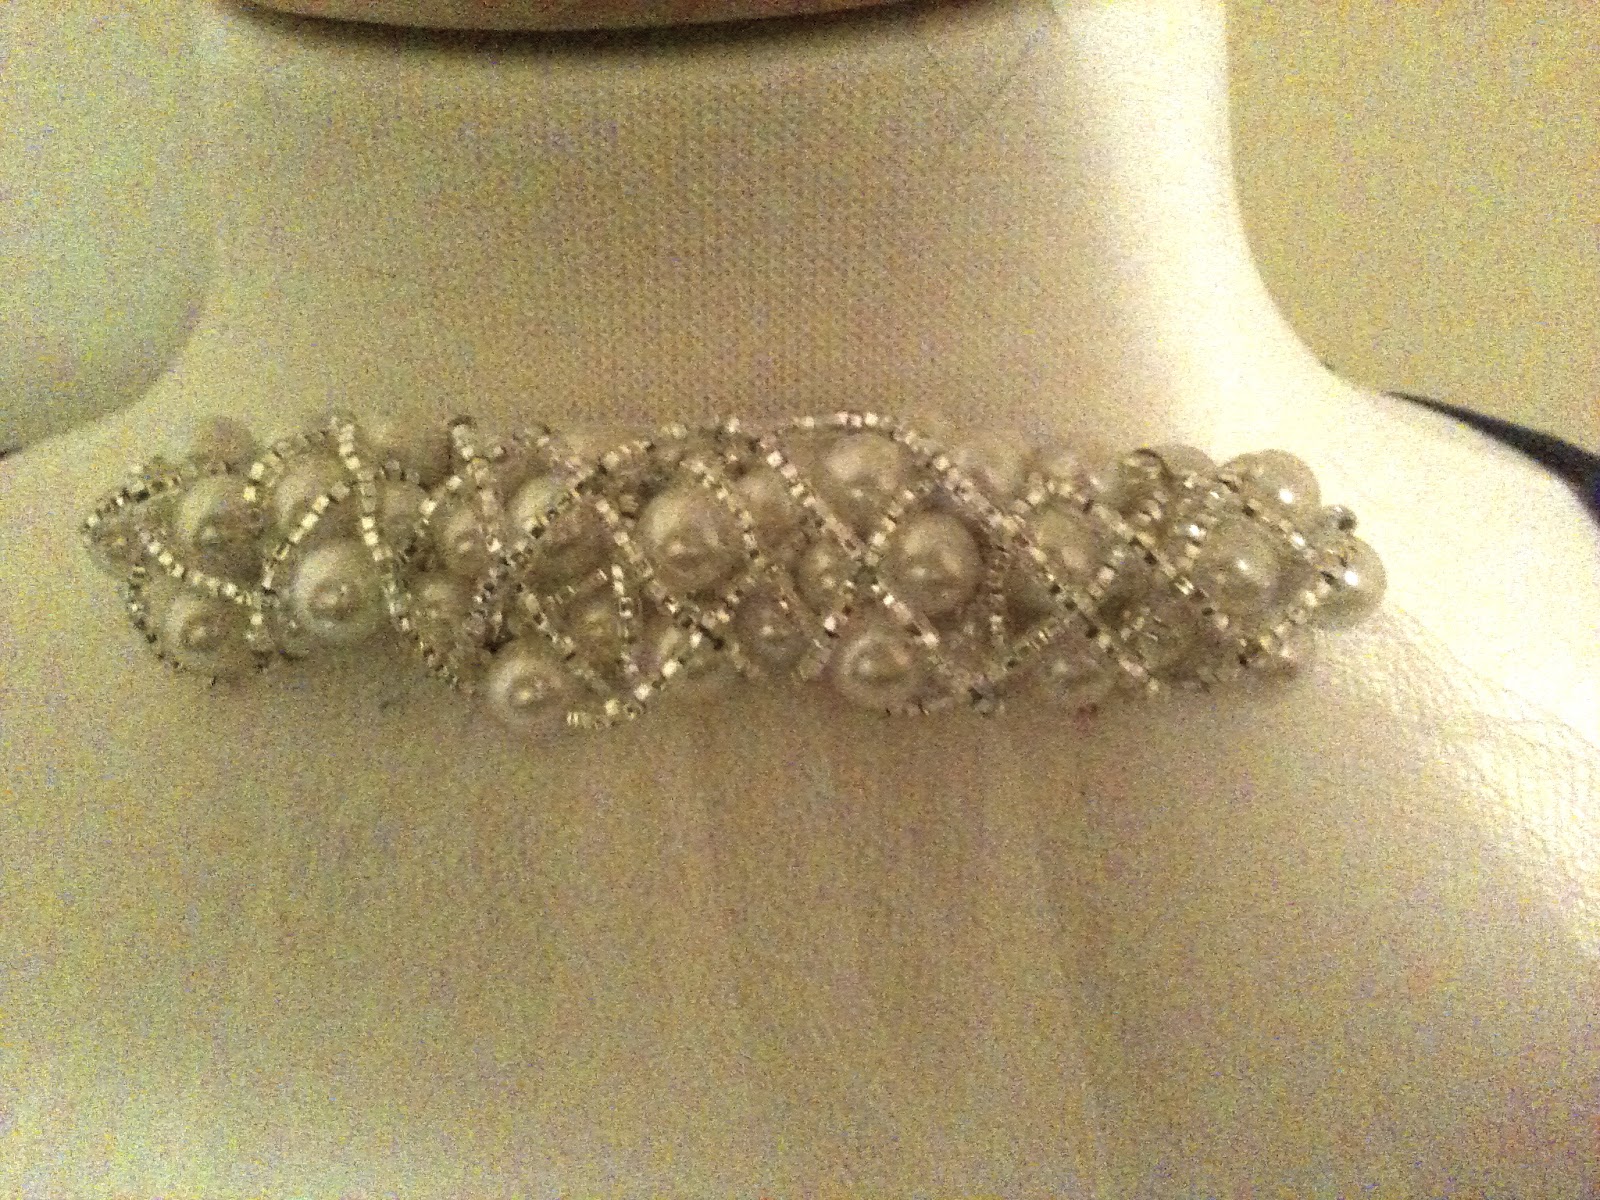
I also wore a vintage (faux) diamond necklace with matching earrings and bracelet and long black gloves. I would have preferred green ones, but couldn't find any at the halloween stores and worried that it would be difficult to find a green that matched the dress by shopping online.

At the party, someone said I looked like a mermaid in the dress, so I may wear it again! Come back after Halloween and look for my mermaid posting!

Detaching a Bodice from it's Skirt


A year or so ago I was invited to a masquerade ball in NYC. I looked high and low for a nice, yet reasonably priced, evening gown that would match a feather mask I bought in New Orleans.

The event was right before prom so I figured I could find a reduced price or clearance gown. I was wrong, but what I did find for $23 was an ugly green dress... with a beautiful beaded bodice. The rest of the dress material with a cheap poly blend, with ugly straps and a short bubble skirt which accentuated my hips that didn't need it. As a whole, it was totally unflattering. But I bought it anyway, put it on my dress mannequin and put my thinking cap on. I decided to remove the straps and the skirt. This is what I was left with:


Then I went to the fabric store (surprise! surprise!) and looked for dress material in a complimentary color as an exact match I soon realized was impossible. Keep in mind, the material had to compliment both the bodice and the mask. To the left is the material I purchased. Several different shades of blue and green, it played off the iridescent sequins and beads on the bodice very well. I then attached the two parts together and added that mask from New Orleans and had a complete costume for the masquerade ball.


Thursday, September 27, 2012

Setting the Stage by Sewing


For my 30th birthday, my husband and I hosted a Cabaret in our home. Acts included a belly dancer, two burlesque dancers, comedy acts, a hoop dancer, a fire eater, and a circus strong man. Here is the poster I made for the show:


For such a classy show, we needed a classy stage backdrop. Using red velvet, I made two panels for the sides of the curtain and my mom made a bubble valance to go across the top and we hung it using the curtain rod that was already in place.


Next (I know this part has nothing to do with sewing, but I will get back to that) we built a stage using milk crates and plywood. Obviously we needed to cover the area below the stage to conceal the milk crates.


Initially, I planned to use a black plastic table cloth for both the backdrop (to cover the remaining part of the window) and the stage "skirt." But changed my mind. Instead, I recycled a fancy sheet that was becoming threadbare in places and unusable. See below for the up-close pattern.


Et voila, here is the finished product:


For reference, the window was 8 ft wide x 4 ft tall and the sill was 3 ft above the floor. The recycled sheet was queen sized.


Wednesday, September 26, 2012

Resizing a Dress That Doesn't Fit

Eons ago, my sister found this dress on clearance at JCPenny. I think she spent $10 on it. Its a beautiful two-tone silk that looks iridescent in the right light. I really liked the dress and since she didn't do anything with it, I stored it away waiting for the right moment that it would fit me in the hips.
That day never came. The dress was too big in the waist and too tight in the hips.

You'll never guess what I did, I went to the fabric store! To look for another fabric that would match that of the dress as closely as possible.  The fabric that I found was not an exact match but pretty close as you will see. I cut open the seams on the sides of the dress from the knee to the waist and attached a triangular piece of the new fabric to loosen the fit in the hips.


Then, I turned the dress inside-out and took in the darts at the waist. At this point, I tried the dress on and felt looked funny with the two strips added to the sides with no other embellishments. So I added a waist band in the color of the added side panels. That still looked a little too plain, so I added a brooch. Below is the final product with a view from the front.


Customizing a Wedding Veil (and a Bachelorette Veil)

A good friend got married in April 2011. She knew what she wanted in a veil but didn't want to spend $200 on it, and who would? So as a wedding gift, I made one for her. We took a trip to the fabric store to get supplies including:

metal hair comb
sturdy ribbon about 3/4"thick
beads: pearls and silver seed
pre-made veil in a box for $14.99 (or you could buy your own tulle to save more money)

Other things I needed but had at home included:

beading supplies (wire, crimp beads, wire cutting tool and crimp pinching tool)
hot glue gun and glue sticks

I did a trial run with the bachelorette veil first. For that I used the plastic hair comb that came with the bridal veil, a yard of neon pink tulle, pink zebra print ribbon to go at the bottom edge of the veil, and a variety of pink beads to string around the top of the veil where the tulle meets the clip to give it a jeweled effect. Here is the finished product, sorry, I don't have a picture of the beading.


Next I tackled the real thing-- the wedding veil. First, I attached the veil to the clip, then I strung beads around the connection between veil and clip using beading wire which easily threads through tulle. To ensure that the beading wire stayed in place, I used a hot glue gun on the back of the clip and concealed it with that sturdy white ribbon. Below is a close up of the clip.


 Below is the whole veil which had little tiny pearls sewn on when we bought it.


 And below is a picture of the veil on the bride on her wedding day.


Recycling an Old Dress

I was asked to be in a wedding that took place last month. The bride was flexible and only had two requirements: dress must be dark purple and must be around knee length. She gave me a few examples of dress styles she liked, but left the choosing to her bridesmaids.

Let's take a step back in time, now... With my mom's help, I made my prom dresses in high school for both Junior and Senior proms. I held on to my Senior Prom dress as I loved the color. Eleven years went by before I had the occasion to wear it again (the wedding last month). But rather than wearing it again, I decided to take it apart and remake it for a bridesmaid dress. Sadly, I don't have a picture of the original dress, but imagine a strapless, A-line, floor-length gown. Not too hard, right?

After I salvaged as much of the fabric as I could, I pinned it on my foam dress mannequin, I love that thing. Below is a close-up of what I wanted the bodice to look like.


And below, here is the whole dress, knee-length at the the bride's request. Obviously, the dress would need to have two layers as this would be beyond scandalous, LOL!


Now, I can pin anything on my dress mannequin and make it look exactly like I want it do, but sewing without a pattern is still beyond my capabilities. So I went to the fabric store and looked at patterns. I could not find an exact match, but found a similar pattern. Here is the finished dress below (I hadn't finished hemming the arm holes at this point).


Sure, I had to buy thread, a new zipper, and fabric for the underside layer of the dress, and I had to invest some time. But in the end, I saved a large sum of money and I got a tailor-made, original dress in the end. 

Creating an Original Wedding Gown

I got married about a year ago now. When I was shopping for a dress, I was disgusted at the price tags! Considering I was only going to wear the dress once, I was not going to spend $1000+! However, I did fall in love with this dress... beautiful, right?


So, I got creative. I found this bridesmaid dress (pictured below) for $160. Better yet, for $20 extra I got 5 extra inches of length to make a small train. Did you know you can get bridesmaids dresses in all colors of the rainbow, including white? The color of my dress was "pearl."


Then I went to Joann Fabrics where I found this beautiful embroidered and beaded lace with a scalloped edge. My mom made a lace overlay for the skirt of the dress and with the remaining scraps, cut the scalloped edge and attached it to the bodice under the chest and at the hip. Below is a picture of the close-up of of the scalloped lace on the bodice.


And, below, here is the dress on me. I know, not as elaborate as the inspiration dress, but I saved a lot of money!